


Simple eSIM setup: your complete guide for travellers
Simple eSIM setup is the process of digitally downloading and activating a mobile data plan on a compatible device without inserting a physical SIM card. For travellers heading overseas, this technology removes the need to hunt down a SIM kiosk at the airport or swap tiny cards mid-trip. Devices from Apple (iPhone XR and later), Samsung Galaxy S20 and beyond, and Google Pixel 3 onwards all support eSIM. Esim4u makes the process straightforward for Australian travellers, offering plans for over 120 countries with clear installation guides for both iOS and Android.
What are the requirements for a simple eSIM setup?
Four prerequisites determine whether your eSIM installation will succeed or stall. Getting these right before you leave home saves a lot of frustration at the departure gate.
Here is what you need to confirm:
- eSIM-compatible device. Apple iPhone XR and later, Samsung Galaxy S20 series and later, and Google Pixel 3 and later all support eSIM natively.
- Carrier-unlocked phone. Carrier-locked phones reject secondary eSIM profiles even when the device itself is eSIM capable. Check your unlock status in your device settings or contact your home carrier before you travel.
- Latest software version. Outdated operating systems cause profile download failures. Update iOS or Android to the most recent version before starting.
- Stable internet connection. You need Wi-Fi or mobile data to download the eSIM profile. Do this at home, not on public airport Wi-Fi.
- Activation details or QR code. Your eSIM provider sends this by email after purchase. Have it ready before you begin.
Pro Tip: Check your carrier lock status before purchasing any eSIM plan. Go to Settings on iPhone and look for “No SIM restrictions” under General > About. On Android, the path varies by manufacturer but is usually under Settings > Connections > SIM card manager.
Carrier lock is the single most common reason eSIM setup fails. A locked phone will not accept a second eSIM profile regardless of device compatibility. If your phone is still under contract, contact your carrier and request an unlock before your trip.
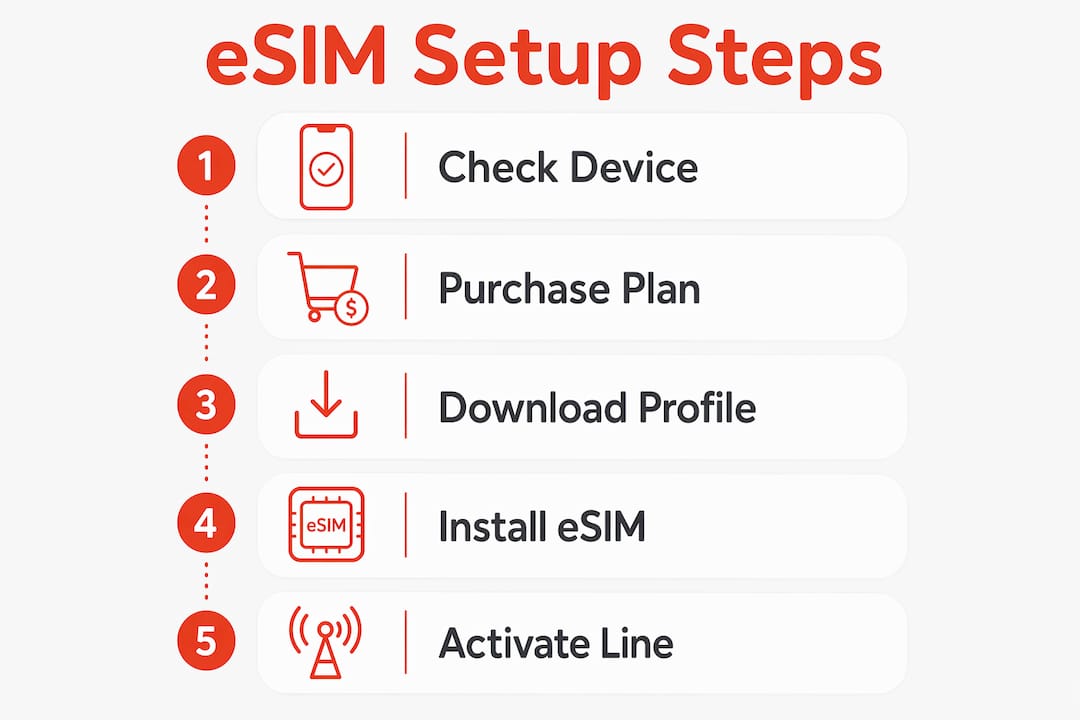
How to complete the eSIM setup process on your device

Most eSIM installations take 2–5 minutes from start to finish. The exact steps differ slightly between iOS and Android, but the core process is the same.
iOS setup (iPhone XR and later)
- Open Settings and tap Cellular (or Mobile Data in Australian iOS versions).
- Tap Add eSIM or Add Cellular Plan.
- Choose Use QR Code and scan the code from your provider’s email.
- Tap Continue when prompted, then label your new plan (for example, “Japan Trip” or “Europe Data”).
- Set the new eSIM as your preferred data line under Cellular Data.
- Enable Data Roaming on the eSIM line.
Android setup (Samsung, Google Pixel, and others)
- Open Settings and go to Connections or Network & Internet.
- Tap SIM card manager or Mobile network, then Add mobile plan.
- Scan the QR code from your provider or tap the one-click install link if your provider supports it.
- Follow the on-screen prompts to confirm and label the plan.
- Set the eSIM as your active data SIM.
- Enable Data Roaming on the eSIM line.
For a full walkthrough tailored to your phone, Esim4u has dedicated guides for Android eSIM installation and Apple device setup.
Setup methods compared
| Method | How it works | Best for |
|---|---|---|
| QR code scan | Scan code from provider email | Most travellers |
| One-click install | Tap a link that installs automatically | Supported providers only |
| Manual SM-DP+ entry | Type server address and activation code | When QR code is unavailable |
Pro Tip: If your QR code scan fails, check that your camera is focused and the code is well-lit. Alternatively, ask your provider for the manual SM-DP+ address and activation code, then enter them directly in your device settings.
The one-click install method is the fastest option when your provider supports it. One-click installation bypasses QR scanning entirely and installs the profile directly from a link in your browser or email.
What is the difference between eSIM installation and activation?
Installation and activation are two separate steps. Confusing them is the most common reason travellers think their eSIM is not working.
Here is the distinction:
- Installation means downloading the eSIM profile to your device over the internet. Your plan countdown does not start at this point. Installing at home is the recommended approach because it avoids relying on insecure airport Wi-Fi.
- Activation means turning on the installed eSIM line and connecting to a local carrier network at your destination. This is when your data plan begins.
- Data roaming must be enabled after activation. Without it, your eSIM will not connect to the local network even if the profile is correctly installed.
- Network detection happens automatically once you land and enable the eSIM line. Your phone searches for a compatible local carrier and connects within a few minutes.
The practical takeaway: install your eSIM before you leave home, then activate it when you land. This gives you instant connectivity the moment you step off the plane, without queuing at a SIM kiosk or scrambling for airport Wi-Fi.
For a deeper look at timing and execution, the Esim4u guide on eSIM activation for travellers covers the full process in plain language.
What are the benefits of using eSIM technology for travellers?
eSIM technology delivers practical, environmental, and security advantages over physical SIM cards. The benefits are especially clear for frequent international travellers.
“eSIM is a critical shift for travellers, enabling immediate, secure mobile connectivity with less risk than traditional SIM card methods.” — Kaspersky
Environmental and practical benefits
eSIM technology reduces CO2 emissions by 46% compared to physical SIM cards by eliminating plastic production and distribution. That is a meaningful reduction for a product used by billions of people globally. Beyond the environment, eSIM removes the risk of losing a tiny plastic card in transit, allows you to hold multiple plans on one device, and delivers instant activation without waiting for mail delivery.
eSIM also changes device hardware. Removing the SIM tray gives manufacturers space for larger batteries and more advanced components. That is a direct hardware benefit you experience every time your phone lasts longer between charges.
Security: what eSIM does and does not protect
| Threat | Physical SIM | eSIM |
|---|---|---|
| Physical theft of SIM card | High risk | No risk |
| SIM-swap fraud | Moderate risk | Still possible |
| Insecure airport SIM kiosk | High risk | Avoided with pre-trip install |
| Profile cloning | Possible | Harder but not impossible |
eSIMs protect against physical SIM theft because there is no card to steal. However, remote SIM-swap fraud remains a risk. Strong authentication with your carrier and a secure email account are the best defences.
Pre-trip eSIM installation also avoids the security risks of airport SIM kiosks, where tampered cards and insecure Wi-Fi are genuine concerns. Installing at home on a trusted network is the safer choice.
Pro Tip: Use a strong, unique password on the email account linked to your eSIM provider. This is your first line of defence against SIM-swap attempts, since attackers often target email accounts to intercept eSIM QR codes.
How to troubleshoot common eSIM setup issues
Most eSIM problems have straightforward fixes. Work through these checks before contacting your provider.
- QR code will not scan. Clean your camera lens, increase screen brightness on the device displaying the code, and try again in better lighting. If it still fails, request the manual SM-DP+ address from your provider.
- Device does not detect the eSIM profile. Confirm your phone is carrier-unlocked. A locked device will silently reject the profile without a clear error message.
- Profile downloaded but no connection. Check that you have enabled the eSIM line in your SIM settings and turned on data roaming. Both steps are required for connectivity abroad.
- Plan not working after arrival. Restart your device. This forces the phone to search for local carrier networks and often resolves detection issues instantly.
- Software update required. Some eSIM profiles will not install on outdated operating systems. Update your phone before attempting setup again.
- Provider support. If none of the above resolves the issue, contact your eSIM provider with your order number, device model, and operating system version. Most providers resolve issues within a few hours.
Pro Tip: Before your trip, test your eSIM by enabling it at home and checking that it shows a signal. You do not need to use data. Just confirming the profile is active and recognised by your device saves a lot of stress at the airport.
For questions specific to data roaming configuration, the Esim4u article on eSIM data roaming explains exactly which settings to check on both iOS and Android.
Key takeaways
Simple eSIM setup requires four confirmed prerequisites, a clear distinction between installation and activation, and data roaming enabled at your destination for the plan to work.
| Point | Details |
|---|---|
| Confirm device compatibility | iPhone XR and later, Samsung Galaxy S20 and later, and Google Pixel 3 and later support eSIM natively. |
| Unlock your phone first | Carrier-locked phones reject eSIM profiles regardless of device compatibility. |
| Install before you travel | Download your eSIM profile at home on a trusted network, not on airport Wi-Fi. |
| Activate on arrival | Turn on the eSIM line and enable data roaming when you land to start connectivity. |
| eSIM is more secure | eSIM eliminates physical SIM theft risk, but strong email authentication is still needed against fraud. |
Why I think eSIM is the best travel decision you can make in 2026
The first time I used an eSIM for an international trip, I was sceptical. I landed in Tokyo, turned on my eSIM line, and had data within two minutes. No queue, no kiosk, no fumbling with a paperclip to open a SIM tray on a crowded train platform.
What surprised me most was how much the pre-trip installation changed the experience. I set everything up at home the night before, confirmed the profile was active, and that was it. The anxiety of “will I have data when I land?” simply disappeared.
Device compatibility has expanded quickly. Three years ago, eSIM was a premium feature on flagship phones. Now it is standard across mid-range devices from Apple, Samsung, and Google. Carrier policies have also improved. Most Australian carriers now unlock devices promptly after contract completion, which removes the biggest barrier for most travellers.
My honest advice: do not wait until the airport to think about connectivity. Buy your eSIM plan a few days before departure, install it at home, and test that the profile is recognised by your device. That five-minute check before your trip is worth more than any troubleshooting guide.
— Peter
Esim4u: hassle-free eSIM plans for Australian travellers
Esim4u offers eSIM plans covering 120+ countries with clear, device-specific installation guides for both Apple and Android phones. Whether you are heading to Europe, Asia, or further afield, you can purchase, install, and activate your plan entirely online before you leave home. Esim4u’s setup guides walk you through every step, from checking device compatibility to enabling data roaming at your destination. For iPhone travellers, the iOS installation guide covers every model from iPhone XR onwards. Android travellers can follow the Android setup guide for Samsung, Google Pixel, and other compatible devices.
FAQ
What is simple eSIM setup?
Simple eSIM setup is the process of downloading a mobile data profile to your device digitally, without a physical SIM card. It takes 2–5 minutes and requires a compatible, carrier-unlocked phone.
Does my phone support eSIM?
Apple iPhone XR and later, Samsung Galaxy S20 and later, and Google Pixel 3 and later all support eSIM. Check your device specifications or go to Settings to confirm.
Do I need Wi-Fi to install an eSIM?
Yes. You need a stable internet connection to download the eSIM profile. Installing at home on your own Wi-Fi is the recommended approach before travelling.
What is the difference between installing and activating an eSIM?
Installation downloads the profile to your device and does not start your plan. Activation turns on the eSIM line and connects to a local carrier network, which is when your data plan begins.
Why is my eSIM not connecting after installation?
The two most common causes are a carrier-locked device and data roaming not being enabled. Confirm your phone is unlocked and turn on data roaming in your SIM settings after arrival.
Recommended
Related Blogs
Explore the World Without Roaming Worries


100% Money Back Guarantee
If you cancel your trip or experience tech issues that we can’t fix; we’ll refund you 100%.